Step-by-Step Guide to Installing Magnetic Track Lights
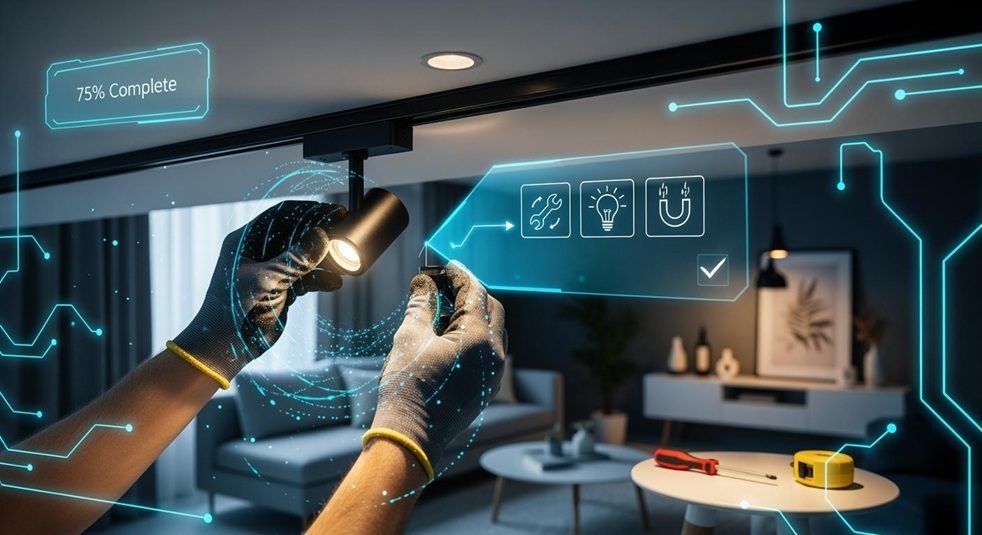
You can put in a dimmable magnetic led track light by following some easy steps and using the right tools. This new light uses magnets to attach lights to a track. You can move and change the lights easily. Before you begin, plan your setup and think about safety.
Tip: Always look for dangers like bad wiring or too much power in circuits. Use the right gear and work carefully to stay safe.
|
Safety Incident |
Description |
|---|---|
|
Electrical Shocks |
You can get shocked by live wires. Use the right tools and follow safety rules. |
|
Falling from a Ladder |
Working high up can make you fall. Use safety gear and be careful. |
|
Fire Hazards |
Sparks and fires can happen. Use safe fixtures and make good connections. |
Magnetic Track Light Basics
What Is a Magnetic Track Light
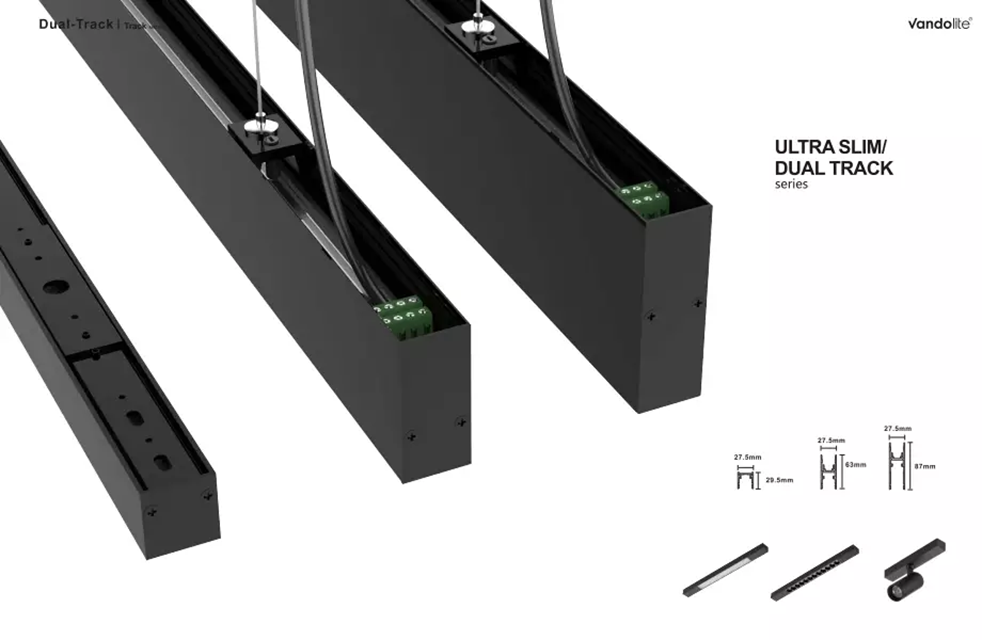
You might wonder what makes a modern recessed magnetic track light different from other lights. This system uses a special track with magnets inside. You can attach light fixtures to the track and move them around without tools. The track rail is usually made from aluminum and has copper strips for power. The lamp body has a magnetic adapter, so you can snap it into place and slide it wherever you want. The power supply changes regular electricity into low voltage, which makes the system safer.
Here are the main parts you’ll find in a Magnetic Track Light system:
-
Magnetic Track Rails: These come in different sizes and styles for your space.
-
Power Supply: This converts your home’s electricity to a safe level for the lights.
-
Connect Track Rail Accessories: You use these to join tracks and create your layout.
-
Magnetic LED Lamps: Pick from many types to get the look and brightness you want.
Tip: You can install these tracks on the ceiling or wall. You can even hang them as pendants for a cool effect.
Key Benefits
When you choose a Magnetic Track Light, you get more than just good lighting. You get flexibility, style, and savings. You can move the lights to highlight artwork, brighten a reading nook, or change the mood in your room. You don’t need tools to adjust the lights, so you can change your setup anytime.
Here’s a quick look at why people love Magnetic Track Lights:
|
Benefit |
Description |
|---|---|
|
Flexibility |
Move lights along the track to fit your needs. |
|
Energy Efficiency |
Use less energy and save up to 30% compared to old halogen lights. |
|
Modern Aesthetics |
Enjoy a sleek, clean look with hidden wires and a minimalist design. |
|
Easy Installation |
Snap lights into place without complicated wiring or tools. |
|
Versatility |
Use in homes, offices, or shops for different lighting effects. |
|
Smart Integration |
Connect with smart home systems for remote control and scheduling. |
You also get a safer system because Magnetic Track Lights use low voltage. This means less risk of shocks. The design fits almost any style, so your space looks modern and tidy. You can add or remove lights as your needs change, and you won’t need an electrician every time.
Tools and Materials
Before you begin, gather all your tools and materials. This helps you work faster and make fewer mistakes. Let’s see what you need for a safe and simple job.
Essential Tools
You do not need special tools, just some basics. These tools will help you finish the job easily. Here is a list to help you get ready:
-
Screwdriver (for turning screws)
-
Electric drill and drill bits (for making holes)
-
Measuring tape or ruler (to measure where things go)
-
Pencil (to mark spots)
-
Level (to keep the track straight)
-
Wire stripper (to remove wire covers)
-
Electrical tester (to check if wires have power)
-
Screws and anchors (to hold the track in place)
-
Wire nuts (to connect wires safely)
-
Magnetic track light kit (with tracks, connectors, and lights)
Tip: Always check your measurements before you drill. Even a small mistake can change how your lights look.
Required Materials
You want your Magnetic Track Light to last and look nice. Good materials help your system work better. Here is a table with the most used materials:
|
Material |
Description |
|---|---|
|
FR4 circuit boards |
These do not rust and carry electricity well. |
|
6063 aviation-grade aluminum |
This aluminum is strong and keeps your track safe. |
You also need power cables, insulation tape, and thin magnetic lamps for your track.
Safety Gear
Safety is very important when working with electricity. Wear the right gear to protect yourself:
-
Insulated gloves (to stop shocks)
-
Flame-resistant clothing (for more safety)
-
Hard hat (if you work above your head)
-
Safety glasses (to protect your eyes)
-
Protective footwear (to keep your feet safe)
Note: Never forget your safety gear. Even a fast job can be dangerous if you are not careful.
Planning the Installation
Confirm Design Pattern
You want your Magnetic Track Light to look great and work well. Start by picking a design pattern that fits your room. Think about how you use the space and where you need the most light. Some people like a straight line of lights for a clean look. Others choose shapes like L-shape or U-shape to light up corners or large areas. You can even try a snake shape for a fun, wavy effect.
Here’s a quick table to help you decide:
|
Design Pattern |
Description |
|---|---|
|
Linear |
A straight line of lights along the track. |
|
L-shape |
Good for corners and corridors. |
|
Oval |
Soft, rounded lighting effect. |
|
Round |
Creates a focal point in the room. |
|
Square |
Fits modern spaces and offices. |
|
Snake shaped |
Wavy design for a dynamic look. |
You can also use a grid or modular pattern for bigger rooms. If you want to highlight a sofa or a dining table, try a U-shape or I shape. Take a moment to sketch your plan on paper. This helps you see how the lights will look before you start.
Choose Track Rail and Lights
Now, pick the right track rail and lights for your setup. Not all rails work with every light fixture. You need to match the track type with the right heads. For example, H tracks only fit H-style heads. J tracks need J-style heads. L tracks go with L-style heads. Some adapters let you mix and match, but it’s better to stick with the same style for best results.
|
Track Type |
Compatibility with Fixtures |
Notes |
|---|---|---|
|
H |
H-style heads |
Only compatible with H-style tracks |
|
J |
J-style heads |
Only compatible with J-style tracks |
|
L |
L-style heads |
Only compatible with L-style tracks |
|
- |
Mixed compatibility |
Adapters may work, but not ideal |
Pick lights that match your style and brightness needs. You can choose spotlights for art or wide lights for general use. Make sure your lights and rails work together before you buy them.
Mark and Prepare Area
Get ready to install by marking your area. Use a measuring tape to find the right spots for your track. Draw lines with a pencil where you want the rails to go. Check that your lines are straight with a level. If you want a shape like L or U, measure each side carefully. Double-check your marks before you drill any holes.
Tip: Take your time with measuring and marking. A small mistake can make your lights look uneven or out of place.
Clear the area of furniture and dust. Make sure you have enough space to work safely. If you plan well, your Magnetic Track Light will look neat and work perfectly.
Installing the Magnetic Track Light
Power Off and Safety
Before you start, turn off the power at the breaker. You want to make sure no electricity flows to the area where you will work. Use an electrical tester to double-check that the wires are not live. Put on your insulated gloves and safety glasses. If you work above your head, wear a hard hat. Safety comes first, so never skip these steps.
Tip: Always check the power twice. If you feel unsure, ask someone to help you confirm.
Attach Power Adapter
Find the spot where you want to connect the power adapter. Most Magnetic Track Light systems use a low-voltage adapter, like 12V or 24V. Some LED spotlights for living room connect straight to 110V or 220V, but many need a transformer. Look at your product’s label to see what you need.
Here’s a quick table to help you match your power supply:
|
Voltage Type |
Voltage Specification |
Current Requirement |
Example Product |
|---|---|---|---|
|
Low-Voltage |
12V/24V |
Needs separate transformer |
Combo Track Lights (12V) for a 10㎡ bedroom, 60W transformer |
|
High-Voltage |
110V/220V |
No transformer needed |
Uranus Track Light (220V) for a 30㎡ retail store |
Connect the adapter to the main power wires. Use wire nuts to keep the wires safe and tight. Wrap insulation tape around the connections. Make sure the adapter sits close to the track rail for easy wiring.
Mount Track Rail
Now, you need to mount the track rail to the ceiling. The way you do this depends on your ceiling type. Here’s a table to help you pick the best method:
|
Installation Method |
Description |
Suitable Ceiling Types |
|---|---|---|
|
Embedded Magnetic Rail |
Fits inside the ceiling for a flush look |
Drywall, plaster ceilings |
|
Surface Mounted Magnetic Rail |
Attaches right on top of the ceiling |
Concrete, wood ceilings |
|
Hoisted Magnetic Rail |
Hangs down for adjustable height |
High ceilings, industrial spaces |
Most people use surface mounting because it’s simple and works for many homes. If you want a modern look, try recessed mounting. For tall rooms, hoisted rails look great.
Follow these steps to mount your track:
-
Measure and mark the spot for the rail using a tape and pencil.
-
Use a level to make sure your marks are straight.
-
Drill pilot holes at each mark.
-
Hold the rail in place and screw it into the ceiling. Make sure it sits flat and does not wobble.
-
Check that the rail feels secure before you move on.
Note: If your ceiling is soft, use anchors to keep the screws tight.
Connect Tracks with Adapter
If you use more than one track rail, you need to connect them with adapters. Push the copper rails forward so they touch the adapter well. Sometimes, tracks slide too far down and lose contact. If you see this, push them back up and try again. Make sure each phase of the rail connects with the end feed. If the lights do not work, re-seat the connection.
Common mistakes to avoid:
-
Tracks sliding too far down, causing poor contact.
-
Not connecting the rail phase with the end feed.
-
Forgetting to push copper rails forward.
Take your time with this step. Good connections mean your lights will work every time.
Connect Power Supply
After you connect the tracks, hook up the power supply. If you use a low-voltage system, connect the transformer to the adapter. For high-voltage systems, connect the wires straight to the rail. Use wire nuts and insulation tape for safety. Double-check all connections before you turn the power back on.
Alert: Never touch bare wires. Always use tools with insulated handles.
Install Magnetic Lights
You’re almost done! Now, snap the magnetic lights onto the track. Hold each light fixture close to the rail. The magnets will grab the track and hold the light in place. Slide the lights to the spots you want. Make sure each light sits straight and feels secure.
Follow these steps for perfect alignment:
-
Gather your lights and check that they match your track.
-
Place each light against the rail. Let the magnets pull it into place.
-
Slide the lights to your chosen spots.
-
Turn the power on and test each light.
-
If a light does not work, check the connection and try again.
Tip: Test the lights before you finish cleaning up. If you see flickering or no light, check the adapter and rail connections.
Your Magnetic Track Light system is now ready. You can move the lights anytime to change your room’s look. Enjoy your new lighting!
Testing and Troubleshooting
Power On and Test
You finished installing your magnetic track lights. Now, it’s time to see if everything works. First, stand back and double-check that all wires are covered and the track feels secure. Put on your safety gear one more time. Go to your breaker box and turn the power back on.
Walk back to your lights. Flip the wall switch or use your remote if you have one. Watch for each light to turn on. If you see all the lights glow, you did a great job! If some lights stay off or flicker, don’t worry. You can fix most problems with a few quick checks.
Here’s a simple checklist to help you test your lights:
-
Look for any lights that do not turn on.
-
Check for flickering or dim lights.
-
Listen for buzzing or crackling sounds.
-
Make sure all lights sit straight on the track.
Tip: If you see a problem, turn off the power before you touch anything.
Fix Common Issues
Sometimes, things don’t go as planned. You might run into a few common problems. Most of these have easy fixes. Take a look at the table below to see what you might face and how to solve it:
|
Issue |
Solution |
|---|---|
|
Compatibility issues |
Make sure all your parts match. Use the same brand or check the specs. |
|
Circuit overloading |
Add up the wattage of your lights. Stay under the limit for your circuit. |
|
Use of low-quality materials |
Pick strong, high-quality tracks. Cheap ones can bend or break. |
|
Improper installation |
Check that your rails are straight and tight. Reinstall if needed. |
|
Lack of maintenance |
Look at your tracks often. Tighten loose parts and clean dust away. |
If you find a light that won’t turn on, try moving it to another spot on the track. Sometimes, the magnets don’t make good contact. If you hear buzzing, check your wiring and connections. Always use good materials and follow the steps. You’ll have bright, safe lights that last a long time.
Note: Regular checks help you catch small problems before they get big. Keep your lights clean and tight for the best results.
Maintenance Tips
Cleaning
You want your magnetic track lights to stay bright and clean. Cleaning them is simple if you follow these steps. Always turn off the power before you start. This keeps you safe. Take off the light fixtures gently. Use a big soft brush to dust off dirt. Get a damp washcloth or a cleaning wipe. Wipe the fixture in one direction only. Do not use too much water. Water can cause problems with electricity. Let everything dry all the way before you put the lights back.
-
Turn off the power first.
-
Take off the fixtures and sockets slowly.
-
Use a soft brush to dust off dirt.
-
Wipe with a damp cloth or cleaning wipe in one direction.
-
Do not soak the fixture.
-
Let it dry fully before turning the power back on.
Tip: Clean your lights often. This helps them look new and last longer.
Routine Checks
Check your magnetic track lights every few months. Look for loose parts, dust, or flickering bulbs. Tighten any screws that are loose. Make sure the magnets hold the lights tight. If you see damage, change the broken part right away. LED magnetic track lights last much longer than old bulbs. Look at this chart to see how long each type lasts:
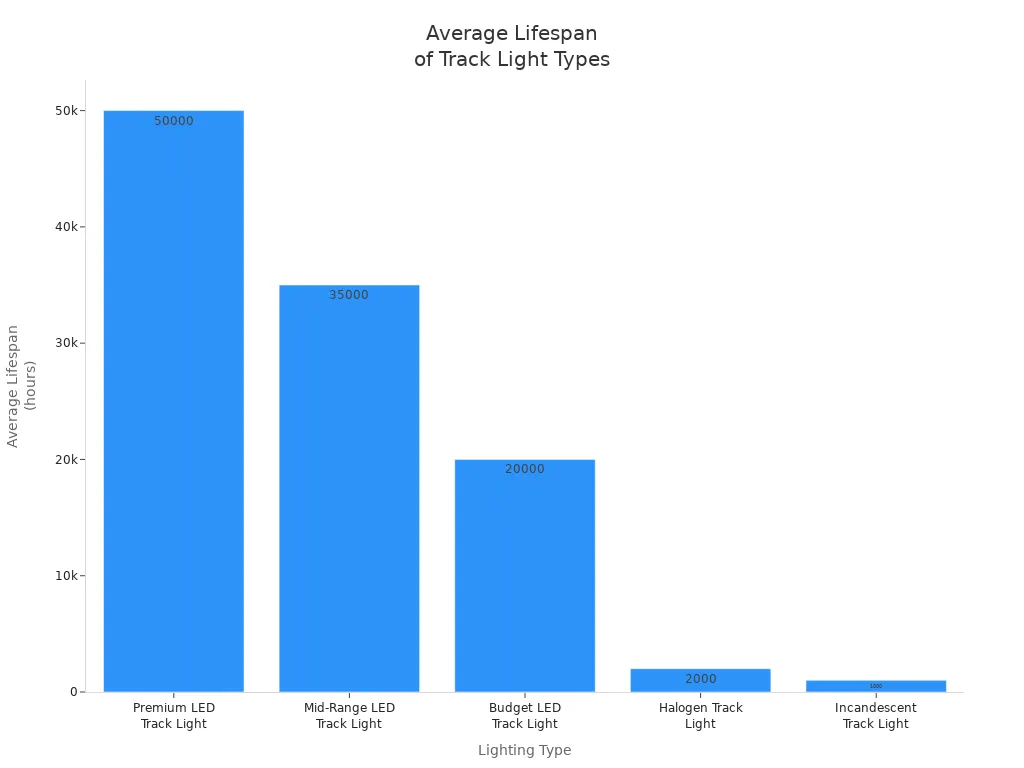
|
Lighting Type |
Average Lifespan (L70) |
Hours Used/Day |
Years of Use |
Replacement Frequency (20-Year Period) |
|---|---|---|---|---|
|
Premium LED Track Light |
50,000 hours |
6 |
22.8 |
0–1 |
|
Halogen Track Light |
2,000 hours |
6 |
0.9 |
22 |
|
Incandescent Track Light |
1,000 hours |
6 |
0.45 |
44 |
LED track lights can last over 25,000 hours. You will not need to change them often. This means less work for you!
Upgrading Fixtures
You may want to upgrade your magnetic track lights for better looks or features. New fixtures have cool things like smart controls and lights you can change. Some even stop flickering. Here are some new features you can get:
|
Feature |
Description |
|---|---|
|
Robust Construction |
Strong aluminum helps keep lights cool. |
|
Stable Magnetic Connection |
Easy to move and stays in place. |
|
Reliable Power Delivery |
Gives steady low-voltage power. |
|
Exceptional Color Rendering |
Colors look bright and real. |
|
Precise Beam Control |
You can change the angle of the light. |
|
Flicker-Free Operation |
No flicker, so your eyes feel good. |
|
Tunable White & Dimming |
Change the color and brightness easily. |
|
Smart Control Compatibility |
Works with smart home systems. |
|
Variety of Fixture Types |
Choose from spotlights, linear lights, and more. |
|
Thermal Management |
Good cooling helps lights last longer. |
|
Compliance & Safety |
Meets safety rules from around the world. |
Note: Upgrading your lights can make your room look new and save energy. You can change old lights for new ones in just a few minutes!
You did it! You installed your magnetic track lights and made your space shine. Remember these safety tips:
-
Wear gloves and safety glasses.
-
Keep flammable items away from the lights.
-
Check all wires and connections for tightness.
-
Inspect for loose fixtures or damaged parts.
-
Use the right voltage for your system.
Keep your lights clean and check them often. Want more style? Try adding glass-head lamps or smart-controlled lights. Here are some ideas:
|
Lighting Idea |
Description |
|---|---|
|
Glass-head track lamps |
Add sparkle and personality to any room. |
|
Bluetooth/Wi-Fi controlled lights |
Change brightness and color with your phone. |
|
Metal shades with vintage finishes |
Give your space a bold, creative look. |
Share your results with friends or try new lighting ideas to make your home even brighter!
